DIY Stamp Carving 2 💮💮(with a $2 Daiso eraser stamp pad!)

Here we go again!
This is my second go at stamp carving, using a $2 Daiso rubber stamp pad instead!

The pad has three colours - white in the middle, and blue and yellow for the top and bottom. You are supposed to carve away the softer blue/yellow layers.
I also bought an Artline Stamp pad (Black) $3.45 ($3.10 if you are a Popular member).
The nice Popular staff recommended Artline - I am indeed satisfied with it! My old, cheap ink pad is made of some kind of cheap foam and it is completely disintegrating. Artline has a nice fine, cotton surface, so your stamp doesn't leave an imprint after.
I only got the Black stamp pad because as much as the colourful ones from Tsukineko (they were also on sale!!!) beckon, I wanted to make sure I had nice stamps before I bought more supplies! Black is classic and I can use them for my existing alphabet stamps.
Anyway, back to the project at hand.
I bought the eraser stamp pad for one reason - to get more surface space to carve my chubbycat88 logo! After all, the logo is done in a modern x ancient Chinese stamp style. How can I not replicate it in real life?
The main difference between the Popular eraser and this eraser pad is that the eraser pad's top most layer is very soft and easy to peel. At first it was kind of disorienting and strange to use but once you get a hang of it, it's actually very useful! You have to be very careful with your cuts however, as the easy peeling goes both ways - small parts can break off T_T

I found a tiny chisel in my dad's toolbox so I tried to use that too. I also learnt that people use something called a U-gouge but I don't have that at hand.
 |
| Attempts 1-4, left to right. |
Here are my results! The first time I thought I had to flip the image so I copied the letters from the other side of the tracing paper D:
I only realised my folly after I finished carving and stamped the design on the paper. Jeez.
My second try I tried not to be so ambitious and made a bigger logo instead. The letters turned out too angular and ended up looking kind of tribal. Not exactly ideal.
Third time's the charm? Nope. I improved some of the curves after watching more videos on YouTube. Tip: Move the eraser clockwise as you carve!
I was almost satisfied with it, but my mum thought that the spacing can be better. My dad thought the 88 should be put together.
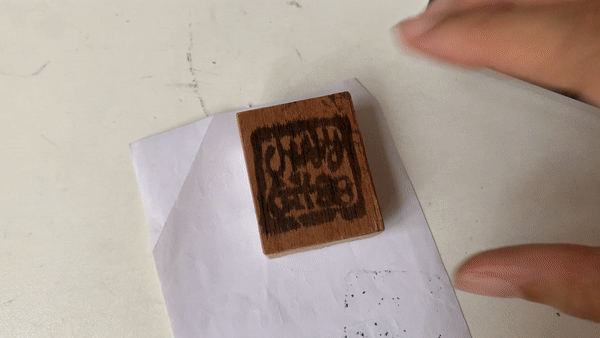
So I got down to work again... to produce the last stamp!
After which, I got some waste wood from my dad and he helped me put the stamp together with some contact/rubber glue.

The whole process was fun! Painstaking and a little backbreaking, but I think I do enjoy making little handmade crafts! I'll hone my carving skills and maybe attempt layered multi-coloured stamping next!
Such a cool project, the stamps look really nice!
ReplyDeleteThank you! I still have a long way to go XD
ReplyDelete